

Showing posts with label Best Toys for PreToddler. Show all posts
Babywise Mom Recommendations

12 Last-Minute Gift Ideas {Friday Finds}

Christmas is almost upon us! Are you still shopping for some people on your list? Here are some last-minute ideas for you. This post contains affiliate links.
VTech Sit-to-Stand: I am not surprised to see this listed among your favorites. We had something similar to this for all of my kids, and I see great demand for these in local classifieds. It is a great toy for little ones.

Suretrack Train Clips: If you have a train-lover in your home, these can eliminate a lot of frustration. Younger siblings can destroy a masterpiece in seconds. Just regular play can make pieces come apart. Some people choose to solve this issue by gluing the track down, but then you lose a huge benefit of train tracks: the creativity. These clips help keep them together while still allowing things to be moved.
Train: If you are getting tracks or clips, a train to go with it is a must!
Melissa & Doug Locks and Latches Board Wooden Educational Toy: We love these type of puzzles.
VTech Drop and Go Dump Truck: Filling, dumping, and trucks. There is a reason this is a best seller!
Pie Face Showdown: Fun game the kids will get a kick out of! We love family game time, and it can be hard with various ages of children to find a game everyone will enjoy.
Spirograph: My grandma had this when I was a kid and I loved it! Our kids enjoy their set.
Shopkins: Shopkins are admittedly a toy I will never understand but a toy that is popular none-the-less.
Slim Doodle: These types of things are GREAT for coloring in places you don't want to risk mess. It is also great for somewhere like the car so the pen doesn't get dropped into the abyss on a road trip.
Hot Wheels: These are a classic that can make a great gift AND great stocking stuffers.
Superhero Costume Capes: Um...enough said.
Pretend Play Makeup Set: For the little girl who wants to be just like her mommy.

Poll Discussion: Best Toys for Babies-Children

Great idea right? We all wonder what toys really stand the test of time and what are favorites. For this poll, comment for as many children/ages you have that apply. Do what age your child is now as well as what they loved in the past. Include:
1-Child's age
2-Child's gender
3-Favorite toy at that age
Let's do the following age breakdowns:
- 6 months or younger
- 7-9 months
- 10-12 months
- 12-15 months
- 15-18 months
- 18-24 months
- 2 year old
- 3 year old
- 4 year old
- etc.-- 5, 6, 7, 8, 9...
DIY Doorway Puppet Theatre {Tutorial}
DIY Doorway Puppet Theatre {Tutorial}
Last Christmas, I was thinking and thinking trying to figure out what to get for Brinley for Christmas. Being my fourth child and third girl, she didn't really need much. I finally settled on wanting a doorway puppet theatre (puppet theater) for her.
Last Christmas, I was thinking and thinking trying to figure out what to get for Brinley for Christmas. Being my fourth child and third girl, she didn't really need much. I finally settled on wanting a doorway puppet theatre (puppet theater) for her.

So I next turned to Pinterest for ideas. There wasn't much. This was my favorite:

But there were no instructions. Never-the-less, I set out to the fabric store.
I wanted it to be a heavy material. I bought home decor canvas and it was on sale at Joanne's. I bought some fabric based on my best estimate of what I would need.
I told my neighbor of my plan and she let me borrow one her mom had made for her kids. Her mom is super creative and great at coming up with her own patterns. So I ended up studying that for my inspiration. And I want to share it with you!
Fabric Needed:
You can make this as fancy or as basic as you would like.
Base: My base is the striped fabric. You want that as long as you need it for the doorway. I did it the width of the fabric. My finished length is 72 inches. remember to calculate the top casing and bottom casing in your calculations. You should be able to do it in 2.5 yards. 3 yards would be very safe.
Back Fabric: You want a fabric to hand down in the back of the hole so the puppeteer can be hidden. Mine finished is 29 inches long. You also need some fabric for hemming, so I would go with 1 yard. I used the extra for the bottom ruffle on my curtains (not a need, just an aesthetic).
That is the only fabric you need. If you want to fancy it up--add:
Curtain Fabric: You will want 1 yard for your curtains. My friend's mom added tassles along the bottom edge of each curtain. I didn't have any on hand and wanted this to be as inexpensive as possible, so I made it look fancy by adding a ruffle to the bottom of each curtain.
Overhanging Fabric: I also used some fabric to hang from the top and at the bottom of the opening. I purchased one yard--I do wish I had purchased more so the bottom hanging section could be bigger. Again, I added a ruffle to the bottom of each piece of fabric to make it fancier.
Bag Fabric: I made a bag to store this in when not in use. I used some leftover fabric from the project and some cording.
Other Materials Needed:
You will need a tension rod that is large enough to go in the doorway you want to use this in.
You will also need two dowels--one for the middle just below the opening and one for the bottom. Cut them to the width of your puppet theatre. These keep the theatre stiff and open in place as your children play with it.
And of course, you will need thread.
Method:
Cut your base fabric to the size you want it, leaving room for hemming and rod pockets.
Hem the sides. I serged and was just going to fold it over and sew it with the serged side exposed, but my perfectionist self decided the back would be seen enough that I did a double roll to hem it.

Hem the bottom and create the rod pockets. To make the casing, I serged the bottom, then folded it under two inches and sewed it in place.

Cut your hole. My finished hole size is 16.5 inches wide and 24 inches tall. I cut it a little smaller than that. The size of your hole will depend on how wide you make the whole thing. Measure, mark (either with pins or with fabric marker/pencils) and then cut. Cut along each side and the top. Leave the fabric attached at the bottom of the hole. You will later fold this to the back of the fabric.

Once your hole is cut, cut a 45 degree angle in the top two corners. Next, serge or finish the 3 inside edges that are raw. I serged, then folded them over once and stitched it in place. If you are making curtains for the front, they will cover up most of the edges for this hole.

Fold the flap from the hole you made so that it is hanging down on the back of the theatre. Press.
Everything up to this point is very simple and straight forward. This is where I had to stop and uncover the genius of my friend's mother. Next, you will be making the rod pocket for the middle of the theatre.
Turn your fabric over so you are looking at the wrong side (the back).
Fold the fabric up two inches. You will be pulling the fabric up from the bottom so there is a 2 inch overlap on itself. You want this fold to line up with the bottom edge of the hole you just cut. Pin this fold in place.

Sew close to the folded edge of the fabric. Sew close to the other folded edge on the front side.

You will now have a pocket. This is for the middle dowel.
Next, serge or finish the edge of the flap in the back. I cut off the excess fabric before I did this.
Okay it gets easier again.
Next, make your back fabric curtain.
- Cut your back fabric so that it is larger than the hole in your base fabric. You will want space for it to have a hem on each side. You will also want it to cover the hole with room to spare.
- Hem each edge.
- Pin the back fabric curtain to the back side of your base fabric over the hole. Sew along the top edge so it is secure on top (do not sew any other side).

- Cut the fabric out. You want them large enough to cover your hole from the front. I decided to gather mind at the top, so I made each curtain wider than half of the hole.
- Hem all sides and top.
- Add anything fancy you want to the bottom of each curtain.
- Pin each curtain in place on the front. My curtains have a bit of space between the inner ends so that they don't cover up so much of the opening. The flaw to this is that when you close the curtain, it doesn't cover the entire opening. You will have to decide if you want more of the opening showing or if you want the curtains to cover the hole completely. To get both, you could apply some velcro to the curtain to help fasten it shut when they are down. During play, the curtains are rarely down.
- Sew in place.

You will next want a way to hold the curtains back while doing your show.
- Cut two strips of fabric. I made mine 5 inches wide and 13 inches long.
- Fold under each short edge, pres, and sew in place so there is no longer a raw edge on the end.
- Fold the fabric in half lengthwise with right sides together (show in picture below). Press.
- Sew along the long edge.
- Turn so the fabric is right side out.

Next, you will sew the strips onto the theatre.
- Fold one strip in half so the two short ends are connected. Pin into place. The bottom of my strip is 3 inches from the bottom of the hole in the theatre. The outside edge of the strip is 3.5 inches from the side of the hole on the theatre.
- Sew the short edges in place.

If desired, create your top fancy piece of fabric.
- Cut the fabric so it is the length you want plus an extra 3 inches (or more if your tension rod needs a larger casing).
- Hem the sides.
- Serge or hem the top.
- I sewed a ruffle on the bottom edge. You can add tassles or simply hem it.
You then sew the right edge of the fancy fabric to the top of the theatre base piece. You will have the right edge going out the opposite direction from the base piece.

Next, fold the fancy fabric down so it hangs over your base fabric. You want it to cover up the top of the curtains and just skim the top of the opening of the hole. Press this edge. Sew 2.5 inches from the edge to create your top rod pocket. Before you do this, be sure 2.5 inches is an adequate size for your tension rod to fit through.
IF YOU DO NOT WANT FANCY FABRIC--create your rod pocket in the same manner as you did the bottom rod pocket above.
Finally, create your fancy piece for the bottom of your theatre if desired.
- Cut your strip of fabric.
- Hem the side.
- Hem the top edge.
- Add ruffles or other embellishments you want.
- Pin just under the rod casing below your hole. Be sure it is straight.
- Sew in place.
I then made a bag:

It is tall enough to hold the puppet theatre with dowels, rod, and all. I can also fit the puppets.
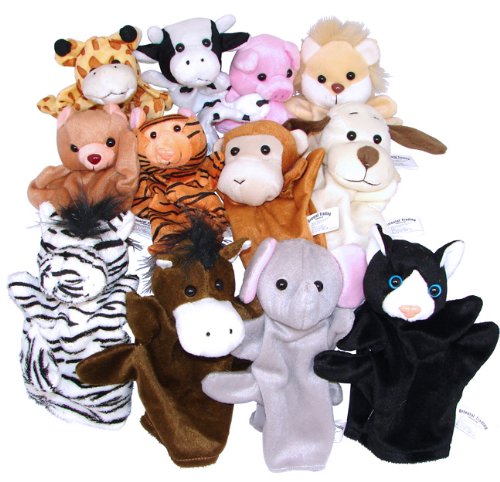
Puppets:

Timeless Toys

Bethany of http://thegracefulmom.com/ asked me to share my top five favorite toys of all time...which is super, super hard for me to choose just five. Never-the-less, I made this list in about 10 seconds. These are toys I have seen used by my children at various ages, so I call them timeless.


 We first got this table when my oldest child was 7 months old. This is the number one most played with toy we have ever owned--except the kitchen. See that below. Every child has LOVED this toy, and the children love it for a long, long time. If a parent were able to only buy five toys in the first five years of the child's life, this should be on their list.


 We got this toy a little over a year ago at the recommendation of my blog readers. So many of them said their child and children loved it, and that they loved it for years, so I thought I had better try this out. My readers were right (of course)! This is one of those toys that produces giggles like crazy, and it is a fun toy that an older sibling can play with a younger sibling. All three of my kids sit around this toy and laugh and laugh. This is another one of those "so worth it" toys.


 This was another reader recommendation. Readers suggested I get this for my youngest for her first birthday. I then did a bunch of research and saw how well this rated on Amazon. So we got it. I must say, this is the perfect doll for the young ones! It is soft and it is safe. I love Baby Stella so much that it is my automatic gift to any one year old girl. There are also lots of fun accessories.


 This is going to be a sneaky way for me to get more than five toys in this post. Anything made by Melissa and Doug is fabulous. We own a whole lot of Melissa and Doug toys, from puzzles, to wooden paper dolls, to train stuff, to kitchen food. You can not go wrong with Melissa and Doug. When Brayden (my oldest) was 2.5, we got him a Thomas the Train figure 8 wooden railway set
 . It is nice, of course. When he was 3.5, we wanted to expand the set for Christmas. We went to our locally owned toystore. There, a worker told us we should consider Melissa and Doug. He said the quality was excellent and the price was even better. To compare, the Thomas Figure 8 set was $40, while this entire set, trains and all, you see in the picture here is $90. Pretty much a no-brainer. Over the years, we have purchased Thomas destinations and Thomas trains, but have this basic kit that gives you all the track you could ever want. (do you like how I worked in Thomas stuff too? I am tricky). I must add, this is something all three of my children love to play with together. Very popular.


 A toy kitchen would definitely be on my list of must-have toys (obviously...here it is). We purchased our toy kitchen when our oldest was 18 months old. He loved it from the first moment, and it gets played with constantly. This is our number one most played with toy. The children all play with it together, and it grows with them and their imagination. You also can easily add to it over the years as they mature. A shopping cart, food, dishes, other accessories...it just never gets old. At least not yet. My children 2-6 play with this daily. There are a lot of kitchen options out there. Everyone will have their own preferences depending on desire for wooden, plastic, size, cost, look, etc. Don't feel like you need to spend a fortune to get your kitchen. My parents still have my old kitchen that is comparable to a $30-50 kitchen today and my kids love it. Kids just love kitchens.
Okay...one more....


 I just couldn't leave this oneTime out. Last but not least. When I was a child, I loved Little People. When my husband was a child, he loved Little People. All three of my children have loved Little People. Just today, my three children made a Little People City and were playing together. There are all sorts of toys available based on interest. I chose to highlight this barn because it has been popular with both genders. My girls have also had a special love for the pet shop and the house, while my son has loved the airport and garage.


Toy Review: Puzzles
Puzzles are a great educational toy. There are a lot of different types of puzzles. Here are some that we have.
Peg Puzzles
Melissa & Doug Deluxe Jungle Friends (Safari) Jumbo Knob


This is a great one for the younger crowd. The knobs on this puzzle are very large (relative to pegs), which makes it easy for little hands to grasp.
I would highly recommend this for children 18 months and younger. Melissa and Doug make these puzzles with barn animals, vehicles, shapes, water animals, pets, etc.

Melissa & Doug Farm Sound Puzzle


 Peg puzzles are great for young children. These peg puzzles are great for your child as soon as she develops her pincher grasp. You can find these puzzles from all sorts of companies and with all sorts of themes. Something fun about this one from Melissa and Doug is that when you put the animal in the right spot, it makes the appropriate animal noise.
Chunky Puzzles
Melissa & Doug Deluxe Wooden Safari Chunky Puzzle

We don't own this yet, but are getting it for McKenna for Christmas so I thought I would tell you about it to take into consideration as you think about puzzles. The fun thing about these puzzles are that the animals can stand on their own for further play. I will let you know how the kids like it; I think it will be a hit.
Touch and Feel
Melissa & Doug Farm Touch and Feel Puzzle


This is one we don't have, but I love the concept and wanted to make sure you know about it. Touch and feel puzzles! They sound fun.
Learning Puzzles

 You can find all sorts of puzzles to promote letter learning, numbers, shapes, hands, feet, etc. We have an alphabet puzzle made by Leap Frog. I can't find it anywhere, so it might be discontinued. Most alphabet puzzles are quite similar.
Sound Puzzles
Melissa & Doug Fire Truck Sound Puzzle

 Melissa and Doug also make a lot of sound puzzles. Brayden has this one. When you complete the puzzle, it makes the siren sound of a fire truck. We also have the farm peg puzzle listed above.
Cube Puzzles
Melissa & Doug Pets Cube Puzzle


I really like these puzzles. They don't require fine motor skills so much as analytical skills. You can make several different pictures with the one puzzle. Your child has to look at small details to figure out which side of the cube goes to the puzzle he is trying to complete, and then where it goes.
Jigsaw Puzzles
Vehicles Jigsaw Puzzles in a Wooden Box

This
 puzzle is comes with four puzzles. The pieces all fit in the box and you can complete the puzzle on the lid. This is a great puzzle to take with you when you travel. We took ours with us one time when we went camping this summer, and I was glad we did. It rained and rained one morning and the kids did puzzles. Each picture has a certain shape on the back of its pieces, so you know which pieces go with which picture.
Prehistoric Sunset Puzzle by Melissa & Doug


A nice thing about this typ eof 24 piece puzzle by Melissa and Doug is that it has a border around the edge. It is a great beginning jigsaw for your child. You can also get this style in 48 piece.
Melissa & Doug USA Map 51 pcs Floor Puzzle


 Floor puzzles are another fun aspect to puzzles.
Feel free to share puzzles you love!
Peg Puzzles
Melissa & Doug Deluxe Jungle Friends (Safari) Jumbo Knob
This is a great one for the younger crowd. The knobs on this puzzle are very large (relative to pegs), which makes it easy for little hands to grasp.
I would highly recommend this for children 18 months and younger. Melissa and Doug make these puzzles with barn animals, vehicles, shapes, water animals, pets, etc.
Melissa & Doug Farm Sound Puzzle
Peg puzzles are great for young children. These peg puzzles are great for your child as soon as she develops her pincher grasp. You can find these puzzles from all sorts of companies and with all sorts of themes. Something fun about this one from Melissa and Doug is that when you put the animal in the right spot, it makes the appropriate animal noise.Chunky Puzzles
Melissa & Doug Deluxe Wooden Safari Chunky Puzzle
We don't own this yet, but are getting it for McKenna for Christmas so I thought I would tell you about it to take into consideration as you think about puzzles. The fun thing about these puzzles are that the animals can stand on their own for further play. I will let you know how the kids like it; I think it will be a hit.
Touch and Feel
Melissa & Doug Farm Touch and Feel Puzzle
This is one we don't have, but I love the concept and wanted to make sure you know about it. Touch and feel puzzles! They sound fun.
Learning Puzzles
You can find all sorts of puzzles to promote letter learning, numbers, shapes, hands, feet, etc. We have an alphabet puzzle made by Leap Frog. I can't find it anywhere, so it might be discontinued. Most alphabet puzzles are quite similar. Sound Puzzles
Melissa & Doug Fire Truck Sound Puzzle
Melissa and Doug also make a lot of sound puzzles. Brayden has this one. When you complete the puzzle, it makes the siren sound of a fire truck. We also have the farm peg puzzle listed above.Cube Puzzles
Melissa & Doug Pets Cube Puzzle
I really like these puzzles. They don't require fine motor skills so much as analytical skills. You can make several different pictures with the one puzzle. Your child has to look at small details to figure out which side of the cube goes to the puzzle he is trying to complete, and then where it goes.
Jigsaw Puzzles
Vehicles Jigsaw Puzzles in a Wooden Box
This
puzzle is comes with four puzzles. The pieces all fit in the box and you can complete the puzzle on the lid. This is a great puzzle to take with you when you travel. We took ours with us one time when we went camping this summer, and I was glad we did. It rained and rained one morning and the kids did puzzles. Each picture has a certain shape on the back of its pieces, so you know which pieces go with which picture.Prehistoric Sunset Puzzle by Melissa & Doug
A nice thing about this typ eof 24 piece puzzle by Melissa and Doug is that it has a border around the edge. It is a great beginning jigsaw for your child. You can also get this style in 48 piece.
Melissa & Doug USA Map 51 pcs Floor Puzzle
Floor puzzles are another fun aspect to puzzles.Feel free to share puzzles you love!
Subscribe to:
Posts (Atom)


